
How to track your website’s exit rates with Google Tag Manager Google Analytics
Google Tag Manager
Your website is a gold mine of data to get to know your customers and visitors. What they do, what they click, and how many times, can tell you a lot about what they want. A website, when integrated with a data analysis and data management system such as Google Analytics, will provide you with solid and real-time knowledge, which in turn will allow you to lead a fruitful, efficiently targeted marketing campaign.
But data analysis is not a random science. To collect meaningful information in a way that is at the same time secure, performant and compliant with data privacy legislation, you need to be well versed in the technical aspects involved when implementing tracking functions on your website. With Google Tag Manager, you can configure e-marketing tags with which to deploy your Google Analytics and gather exactly the data that YOU need. Tags are used to add functionality to your website, such as for instance audience measurement (who are your website users), campaign analytics (how do your ads perform) and conversion tracking (how many users take action and actually become customers).
In this article we will show you how we use Tag Manager to configure triggers to fire Google Analytics tags responsive to a specific type of events, namely clicks on external links or buttons. This is especially useful for our clients who have websites with extensive portfolio or many partners, and who want to monitor their website’s outflow, that is to say which link their users are exiting the website from and where they are going to.
1. Log in to your Tag Manager account
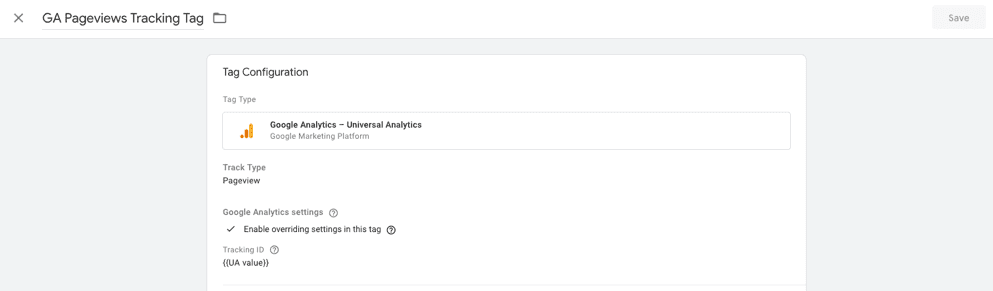
First things first, make sure you have a Google Analytics account installed with your website. Then simply open https://tagmanager.google.com and use your Google Analytics account ID to log in to your Tag Manager account. Your Tag Manager dashboard should look like this: 2. Add a Google Analytics Pageview tag if one does not already exist.
- Click Tags
- Click New > Rename “Untitled Tag” with “GA Pageview Tracking Tag”.
- Click Tag Configuration > Edit > Choose tag type Google Analytics – Universal Analytics.
- Set Track type to Pageview.
- Enable overriding settings and set Tracking ID to UA value.
- Click Triggering > Edit > Choose a trigger All pages.
- Click Save.
 3. Set up your variables.
 - Click Variables.
- In the Built-in Variables section click Configure > Enable the checkbox for Click URL.
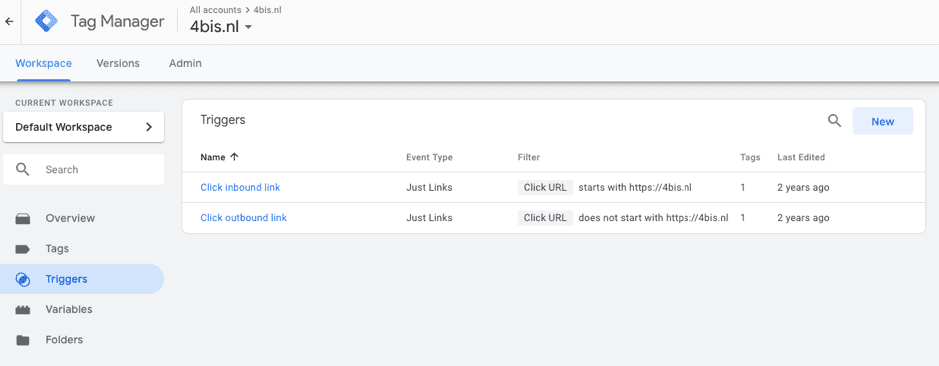
4. Create Triggers to track link clicks.
- Click Triggers.
- Click New > Rename “Untitled Trigger” with “Click outbound link”
- Click Trigger Configuration > Edit > Choose Trigger type Just links.
- Enable the checkbox This trigger fires on some link clicks.
- In the drop-down menus, select “Click URL”, “does not start with”, and paste your website’s URL including http:// or https:// (for us it is https://4bis.nl ).
- Click Save.
Thanks to these settings, the tracking tag will be fired whenever a user clicks on an external link in your website – aka a link with a different URL than yours: this means that you’ll be able to see in your Google Analytics through which links your users are leaving your website.You can also track the clicks within your website and the traffic between your internal pages, by setting up a Click inbound link trigger.
 5. Create your outbound Google Analytics tracking Tag.
- Click Tags.
- Click New > Rename “Untitled Tag” with “GA event outbound”.
- Click Tag Configuration > Edit > Choose tag type Google Analytics – Universal Analytics.
- Set Track type to Event.
- In Event Tracking Parameters, set Category to link, set Action to outbound, set Label to Click URL.
- Enable overriding settings and set Tracking ID to UA value.
- Click Triggering > Edit > Choose a trigger Click outbound link.
- Click Save > Click Submit.
Easy, right? Now that you are all set, click on any external link on your website, then go on your Google Analytics dashboard, select All website data > Real-time > Events, and enjoy the results of your hard work!See you next time for more tech fun,
The 4BIS team.
What Can We Solve For You?
Is your business facing tech headaches or project bottlenecks? Tell us your biggest challenges—we’re here to help you overcome them, whether it’s with custom software, cloud solutions, or a fresh perspective. Share your headache!
SCHEDULE A FREE CALL